Are you ready to transform your kitchen with cabinets that fit your space perfectly and reflect your personal style? Building your own kitchen cabinets might sound challenging, but it’s a rewarding project that puts you in full control—from choosing the wood to customizing every detail.
Imagine saving money while creating something uniquely yours, crafted to match your kitchen’s exact dimensions. In this guide, you’ll discover clear, step-by-step instructions that make cabinet building easier than you think. Whether you’re a beginner or have some woodworking experience, by the end, you’ll have the confidence and knowledge to build beautiful, functional kitchen cabinets that elevate your home.
Let’s dive in and start turning your kitchen dreams into reality!

Planning Your Cabinets
Accurate measuring of your kitchen space is the first step. Use a tape measure to note the height, width, and depth where cabinets will go. Write down measurements clearly. Check for obstructions like pipes or outlets.
Choosing the right cabinet style affects both function and look. Popular styles include shaker, flat-panel, and raised-panel. Think about the kitchen’s overall design and your personal taste.
| Material | Features | Common Use |
|---|---|---|
| Solid Wood | Durable, classic look, expensive | High-end cabinets |
| Plywood | Strong, less expensive than solid wood | Cabinet boxes |
| MDF | Smooth surface, budget-friendly | Painted cabinet doors |
Hardware like handles and hinges must match your style and last long. Choose simple designs for easy use. Make sure they fit your cabinet size.

Gathering Tools And Supplies
Essential woodworking tools include a saw, drill, sander, and clamps. A measuring tape and square help keep cuts accurate. A screwdriver and hammer are also important for assembly. These basic tools make building easier and more precise.
Types of wood and plywood vary by durability and cost. Solid wood like oak or maple is strong but expensive. Plywood is cheaper and less likely to warp. Choose plywood with a smooth veneer for cabinet faces.
| Type | Use | Cost |
|---|---|---|
| Oak | Cabinet frames and doors | High |
| Maple | Cabinet faces and drawers | Medium |
| Plywood | Cabinet boxes | Low |
Hardware and finishing materials include hinges, handles, screws, and nails. Choose quality hinges for smooth door movement. Finishing materials like paint or stain protect the wood and add color. A clear sealant helps cabinets last longer.
Cutting And Preparing Parts
Start by cutting panels and frames accurately. Use a sharp saw for clean edges. Precise cuts ensure all parts fit well together. Measure twice, cut once.
Sanding is key to smooth surfaces. Sand edges gently to remove rough spots. Prepare edges to make assembly easier and improve the final look.
Label each component clearly. Mark panels and frames with simple codes. This helps during assembly and avoids confusion. Organizing parts saves time and effort.
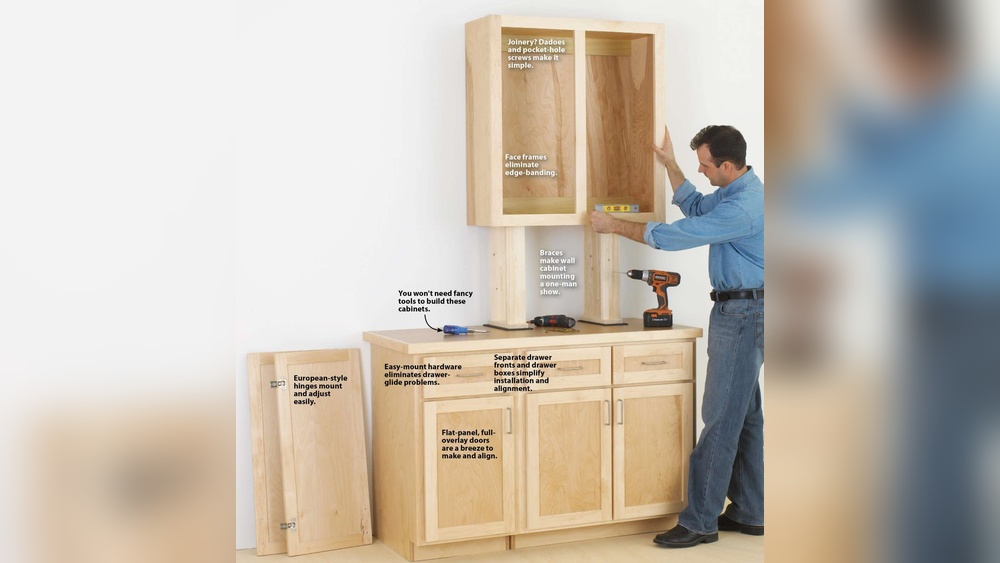
Assembling Cabinet Boxes
Start by cutting side panels and bottom pieces to size. Use strong plywood or MDF for durability. Attach the bottom panel to the side panels using screws or pocket hole fasteners. Drill pilot holes to avoid splitting the wood. Fasteners should be spaced evenly for a firm hold.
Check that the cabinet box is square by measuring the diagonals. Both diagonals must be equal. Use a carpenter’s square to confirm all corners are at right angles. Adjust by tapping panels gently if needed.
Place the box on a flat surface to ensure it is level. Shim or sand uneven spots to correct. Proper squaring and leveling ensure the cabinet fits well and supports weight properly.
Constructing Doors And Drawers
Designing door frames requires precise measurements for a good fit. Use sturdy wood, like hardwood, for strong frames. Cut the pieces carefully, ensuring edges are smooth. Join the pieces using wood glue and nails or screws. Make sure corners are square for a neat look.
Assembling drawer boxes involves cutting the sides, front, back, and bottom panels. Use plywood for a solid drawer box. Attach the sides to the front and back with glue and nails. Slide the bottom panel into grooves or attach it with screws. Check for square corners before the glue dries.
Installing drawer slides and hinges is the final step. Attach drawer slides to both the drawer and cabinet frame. Make sure slides move smoothly. Fix hinges to the door and the cabinet frame. Adjust hinges for even door gaps and proper alignment.
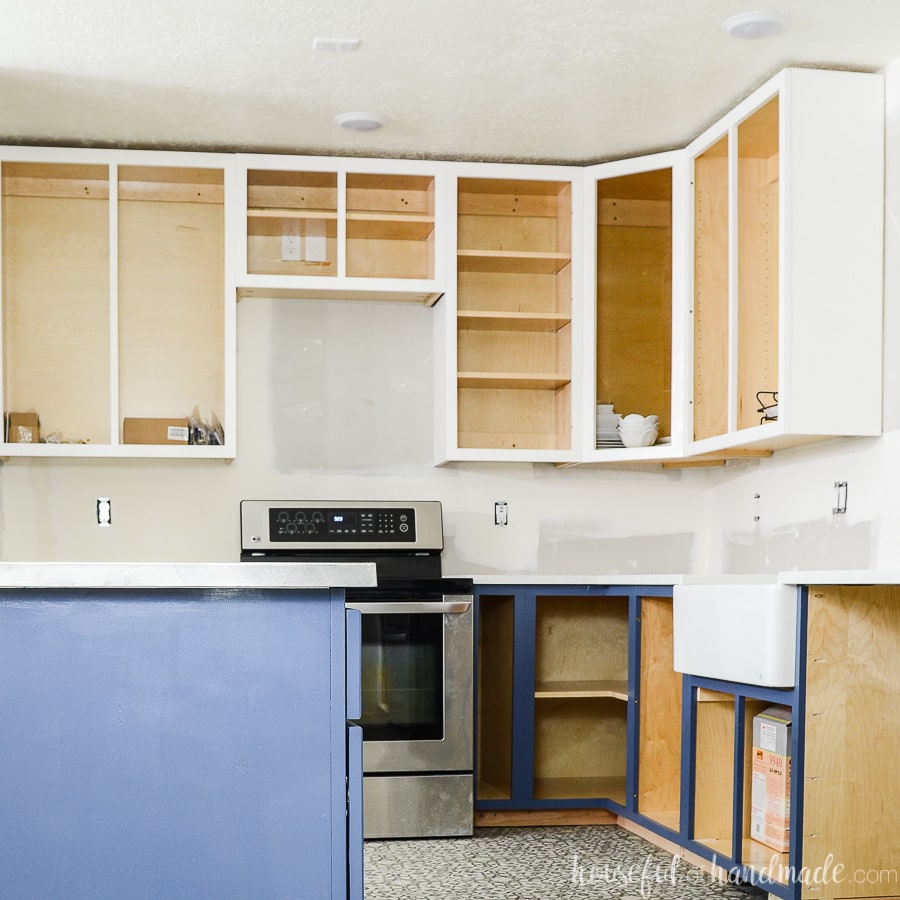
Finishing And Installing Cabinets
Applying paint or stain helps protect wood and improve its look. Use a brush or cloth to spread paint or stain evenly. Let each coat dry fully before adding another. Light sanding between coats gives a smooth finish.
Attaching doors and hardware needs care to align parts correctly. Screw hinges to doors first, then attach doors to cabinet frames. Handles and knobs go last. Check doors open and close without rubbing.
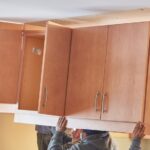
Securing cabinets to walls keeps them safe and steady. Use a level to make sure cabinets are straight. Find wall studs with a stud finder and screw cabinets securely into them. Use clamps to hold cabinets while fastening.
Tips For Beginners
Avoid common mistakes like rushing or skipping measurements. Mistakes waste wood and time. Take your time to measure twice and cut once. Always check the fit of pieces before assembly.
Managing your time well helps the project go smoothly. Set small goals for each work session. Break tasks into parts like cutting, assembling, and finishing. This makes the work less overwhelming.
Improving woodworking skills is key. Practice simple cuts and joinery before starting cabinets. Use clamps to hold pieces steady for better accuracy. Watch tutorials to learn new techniques and tips.
Cost And Time Considerations
Budgeting materials and tools is key for kitchen cabinet projects. Wood types, screws, hinges, and paint affect costs. Basic tools like saws, drills, and clamps are needed. Renting tools can lower expenses.
Estimating project duration depends on skill level and cabinet complexity. Simple designs take a few days; complex ones may take weeks. Allow extra time for drying paint or finishes.
| Type | Cost | Time | Skill Required |
|---|---|---|---|
| DIY Cabinets | Lower (materials + tools) | Longer (days to weeks) | Moderate to High |
| Buying Cabinets | Higher (ready-made price) | Shorter (hours to days) | Low |
DIY builds save money but need time and skill. Buying cabinets costs more but is faster and easier. Choose based on budget, time, and ability.
Alternative Options
Ready-to-assemble cabinets save time and effort. These come in flat packs and include all parts. Assembly is simple with basic tools. They cost less than custom cabinets but offer fewer design choices.
Customizing stock cabinets allows some personalization. You can change the paint, knobs, or add trim. This option is cheaper than full custom cabinets but looks more unique than ready-to-assemble.
Hiring professionals ensures expert design and quality. Pros handle measurement, building, and installation. This choice costs more but saves time and avoids mistakes. Ideal for those who want perfect results without DIY work.
Frequently Asked Questions
Is It Cheaper To Build Your Own Kitchen Cabinets?
Building your own kitchen cabinets can be cheaper if you have tools, skills, and time. Otherwise, costs may rise.
Can A Beginner Build Cabinets?
Yes, beginners can build cabinets by following clear plans and using basic woodworking tools carefully. Practice and patience improve results.
What Kind Of Wood To Use To Build Cabinets?
Hardwoods like maple, oak, cherry, and birch offer durability and beauty for cabinets. Plywood provides strong, stable cabinet boxes. Choose wood based on budget, style, and durability needs for lasting cabinets.
What Are The Three Basic Methods Of Cabinet Construction?
The three basic cabinet construction methods are framed, frameless, and inset. Framed cabinets have a face frame. Frameless cabinets lack a face frame for more storage. Inset cabinets feature doors flush with the frame for a clean look.
Conclusion
Building kitchen cabinets takes patience and careful work. Start with good plans and measure twice before cutting. Use quality materials to ensure strong, lasting cabinets. Take your time assembling parts for a neat finish. Custom cabinets add value and fit your kitchen perfectly.
This project saves money if you have tools and time. Enjoy the satisfaction of creating your own kitchen storage. Keep learning and improving skills with each project you try. Your kitchen will look great with cabinets you built yourself.

Yes, working as , Food Blogger and Product Reviewer for last 6 years. Here you will get amazing deals for Smart kitchen products. I am your best source for the latest update in cooking trends. I provide insightful articles, reviews, and analysis on cutting-edge kitchen gadget. My mission is to empower readers with the knowledge they need to stay ahead in a rapidly evolving coking world. Join me as we explore the future of food technology and how it shapes our lives today and tomorrow.